

Installing a Newport trolling motor onto a transom is an effortless task with the transom mount bracket. Many boats have a built-in transom like the one in the video below. Our motors have a simple mount design that clamps onto the transom.
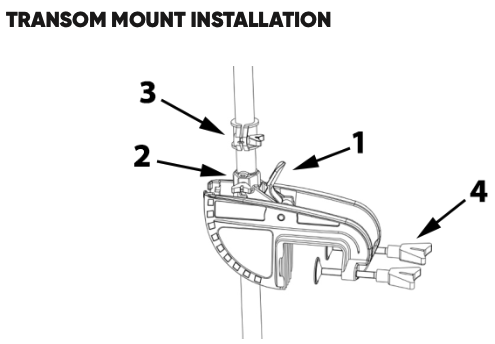
Please see the step-by-step instructions below for guidance on installing the motor onto your boat. Below is a labeled reference image with part numbers for a Transom Mount Installation. You can view the YouTube video at the end of this article to see the function of the motor mount on one of our inflatable boats!
Trolling Motor Installation:
- Install the circuit breaker and propeller on your motor. For more detailed instructions on how to assemble your circuit breaker and propeller, please see our Propeller and Circuit Breaker Assembly article.
- Your motor is shipped with the mount titled vertically. To install the motor, the mount will need to be positioned horizontally. To do this, push the tilt lever (Part #1) towards the shaft while pushing the mount down. NOTE: Make sure your fingers are clear of the moving parts to avoid pinched skin or fingers.
- Before getting inside your boat with the trolling motor, tighten the Directional Lock (Part #2) and Height Adjustment Collar (Part #3). This will prevent your motor from spinning freely or falling suddenly. Next, slowly lower the motor mount onto your transom. The handle should be facing you, and you should be holding the weight of the motor, so it does not take a swim! You may need to loosen your transom screws (Part #4) to allow enough room for the mount to sit on your transom.
- Tighten the transom screws, so your motor is tightly positioned in the center of your transom. Screws should be tight and secure but not over-tightened as this can cause the screws to strip or even damage the transom.
- With a firm grasp on the motor shaft, loosen the Height Adjustment Collar and position the center of the propeller about 12" under the water's surface. Once the appropriate depth has been reached, slide the Height Adjustment collar down to meet the Directional Lock and fully tighten it to lock the height. NOTE: If the Directional Lock is fully tightened, you may need to loosen this part to adjust the motor height.
Tip: Part #1 is used to change the angle of the shaft in the water. This is often used to take the propeller out of the water in order to remove debris. It also can be used to stow the motor out of the water. See the video below for an example of how the motor can be adjusted.
If you have any additional questions about our motors, please see our Motors FAQ Page. For more in-depth articles, please visit our Resource Guides page. If you can't find the information you need, give us a call (866) 721-0002 Monday to Friday: 8:30 am - 4:30 pm or reach out to us via email at SUPPORT@NEWPORTVESSELS.COM.
